
Pricing & Printing Instructions
Pricing, Payment, & Paper Types
Pricing, Payment, & Paper Types
Payment
We can only accept payment via GopherGold. Please click the following link to manage your GopherGold account before submitting a file to be printed.
Laser Printing—Black & White
| Media | Size | Price |
|---|---|---|
| Letter: Single-Sided | 8.5 x 11" | $0.08/ side |
| Letter: Double-Sided | 8.5 x 11" | $0.05/ side |
| Tabloid: Single-Sided | 11 x 17" | $0.16/ side |
| Tabloid: Double-Sided | 11 x 17" | $0.10/ side |
Laser Printing—Color
| Media | Size | Price |
|---|---|---|
| Letter: Single-Sided | 8.5 x 11" | $0.15/ side |
| Letter: Double-Sided | 8.5 x 11" | $0.11/ side |
| Tabloid: Single-Sided | 11 x 17" | $0.22/ side |
| Tabloid: Double-Sided | 11 x 17" | $0.11/ side |
NOTE: We do not accept personal paper in our laser printers.
Large Format Printing (Plotting)
| Media | Price** | Best for |
|---|---|---|
| Bond | $1.00/ linear foot | Drafts and tests |
| Matte | $3.00/ linear foot | Final presentations without a glossy finish |
| Satin | $3.00/ linear foot | Final presentations with a glossy finish |
| Fabric | $7.00/ linear foot | Projects best served by printing on fabric |
* Cotton sheeting is only available in McNeal
** Divide the cost by 12 for an approximate price per linear inch. E.g. $7.00 per linear foot = ~$0.58 per linear inch
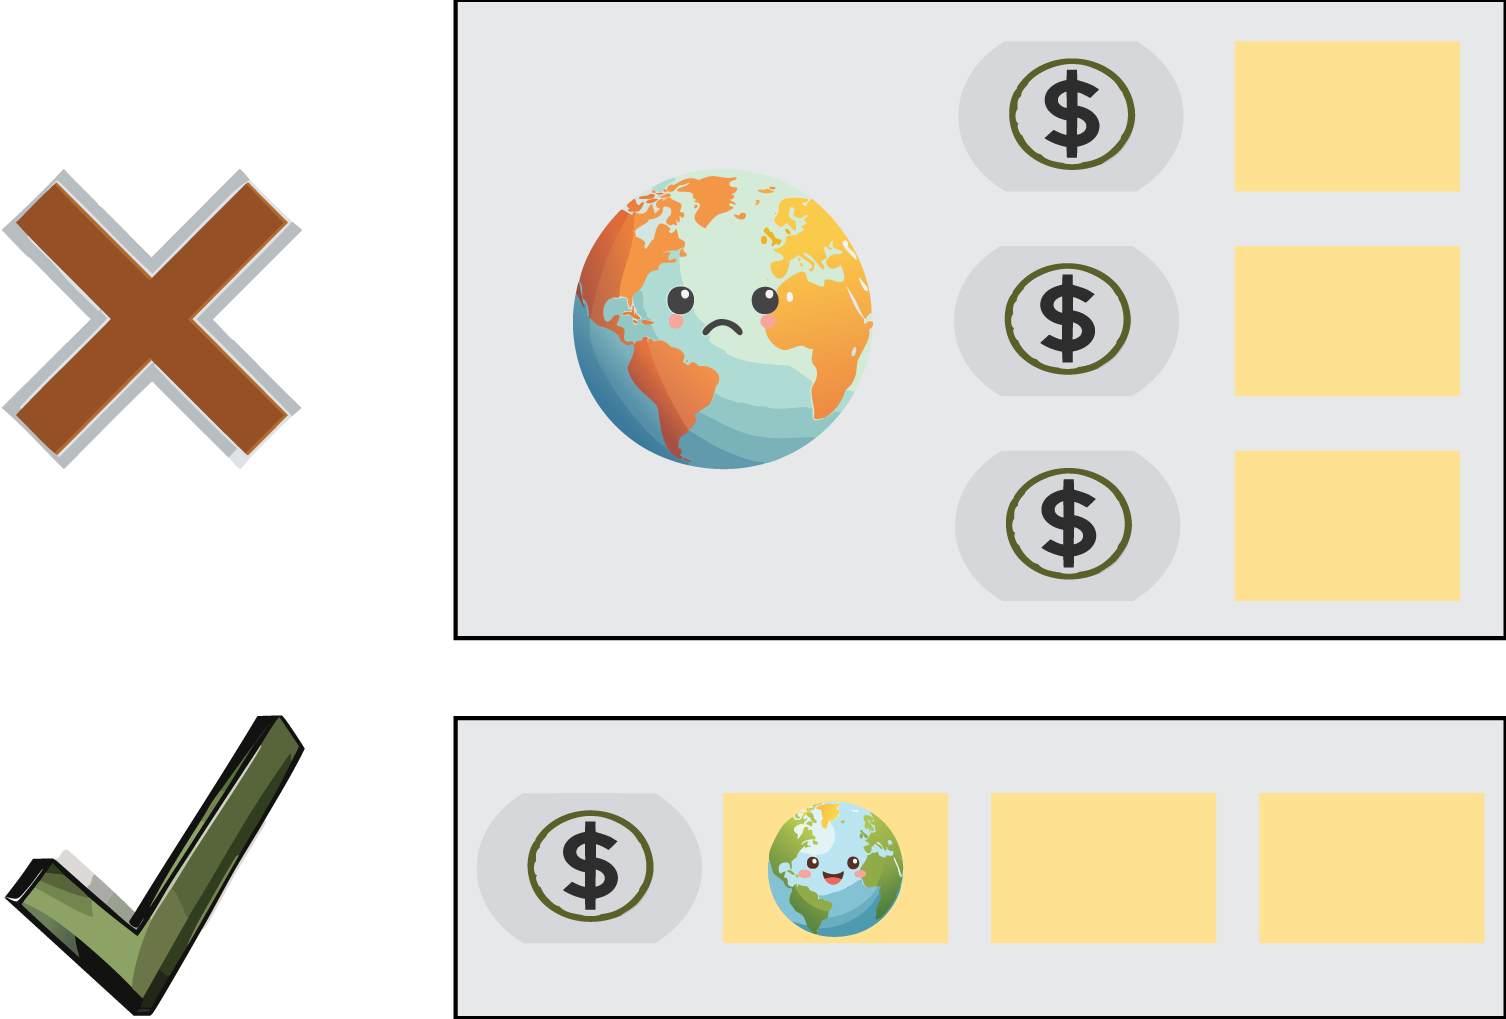
Save Money! Save The Earth!
We charge per linear inch printed and will rotate your documents whenever possible to reduce your price. If you have multiple small elements or pages you'd like printed on the large format printers, you can arrange them horizontally along the ~41.5" printable width. This will also help eliminate wasted paper and make the earth a little happier.
Epson InkJet Printing
| Media | Price | Notes |
|---|---|---|
| Photo Paper | $2.00/ sheet | Provided by CDES IT |
| Personal Paper | $2.00/ sheet | Provided by the user 17" max width, 22" max length, and 0.8mm max thickness We'll try our best, but not all paper types will work |
| Transparency | $2.00/ linear foot | Provided by CDES IT 17" wide, clear printing medium. |
Guide: Laser Printing
Guide: Laser Printing
Our laser printers are self-service. You can print them from any lab computer or download a driver for your personal device. Please note that if you have an Apple computer, you may encounter issues with double-sided and tabloid printing.
Size Limits
CDES IT provides the following paper sizes for laser printing:
- Letter Size (8.5 x 11")
- Tabloid Size (11 x 17" )
NOTE: We do not allow custom paper in our public laser printers.
Process Overview
- Prepare your file (your file should be in PDF format).
- Secure funding. Review the pricing tab in the navigation pane and verify that you have the appropriate amount of GopherGold on your account.
- Follow the steps below to print your file.
- Won't document Print? Go to Troubleshooting.
Before you print, note the following:
- Campus Cloud Print—Our printing stations don't support CampusCloud Print (mobileprint.ad.umn.edu). Please use a lab computer or download a print driver to print to our stations.
- Document size—The laser printers can only print on 8.5 x 11" (letter) or 11 x 17" (tabloid) paper. If you send a different size, the printer will throw an error. See Troubleshooting to address this.
- File format—Please output your files as PDFs.
- Use the correct application—Print from the Adobe Acrobat desktop application. The browser-based version of Acrobat and other applications are unreliable, and you might lose your funds when trying to print from them.
- Use a Windows computer for maximum flexibility—Always check print settings before printing! If you wish to change to non-default settings, please use a Windows computer. Apple computers cannot adjust these settings in a user-friendly way.
- Give yourself plenty of time—Printing takes time (optimization, creating a PDF, correcting orientation, etc…). Make time for the possibility of a re-print, especially during peak demand periods, like review/finals weeks. Submit your file(s) at least 24 hours before they are due to minimize stress on yourself and others.
Detailed Steps
- Prepare your file: Download the file to your desktop and convert it to a PDF if you haven't already. If you are having trouble with this step, open your file in Adobe Illustrator or Adobe Photoshop and follow the instructions in Saving As PDF/X. If that article does not help, please look online for instructions on converting your file to a PDF in the program you are using.
- Select the appropriate printer: Open the Adobe Acrobat *Desktop App, click the print icon (or simultaneously hold Ctrl + P), and select a printer based on your location: CDes_Rapson##_Laser or CDes_McNeal##_Laser. (## tells you which room the printer is located in).
- Set color and paper size:
- Check or uncheck the Print in Grayscale (black and white) box as desired. If the box is left unchecked, you will be charged for a color print job.
- Select Page Setup.
- Select Letter (8.5 x 11”) or Tabloid (11 x 17”). The setting may be listed under its numeric or named value. Please note that other selections will not work.

- Set double or single-sided printing:
- Press Properties.
- Choose long/short-edge binding or Off. Selecting Off disables double-sided printing.

- Click OK in the Canon pop-up, then select Print in the original pop-up. The job will be sent to the Laser Printing Release Station next to the laser printers.
- Follow the instructions on the release station from there.
* You are welcome to try to print from other applications, which may sometimes work. However, CDES IT has determined that printing from the Adobe Acrobat Desktop (not browser-based) App is the most consistent experience we can offer. If you choose to use another app, you do so at risk of wasting your time and funds.
Troubleshooting
My Document Won't Print
- Check if there is paper in the printer. Feel free to load paper or ask a lab attendant for help.
- Check the printer for a wrong paper type error.
- Print from the Adobe Acrobat Desktop application. The browser-based application does not work.
- Select the correct paper size. Review the laser printing steps and make sure you are selecting either 8.5 x 11"(letter) or 11 x 17"(tabloid). Other selections don't work.
Double-sided Printing & Paper Size Issues
- Use a Windows computer. Apple computers are not good at adjusting these settings.
- Review the laser printing steps for how to adjust these settings
ERROR: Wrong Paper Type
You will know this happens when the printer's error light is red, and no jobs are coming out. The most common error on the printer is the wrong paper type error. This happens when a user does not specify Letter (8.5 x 11") or Tabloid (11 x 17") paper when printing. To fix this, the user must tell the printer which tray to use for the paper.
| Photo Guide: | 
| 
| 
|
|---|---|---|---|
| Action: | Notice that the error light is lit up/flashing red. | Press Status Monitor/Cancel. | Choose a tray with paper in it (a red icon means it's empty), and click OK. Its usually best to pick a tray with 11 x 17" paper loaded. |
Guide: Large Format Printing (Plotting)
Guide: Large Format Printing (Plotting)
Follow the tips and steps below to make your large-format printing experience as stress-free as possible:
Size Limits
Max Document Width: 41.5"
Max Document Length: 31,800px (106" @ 300 DPI).
Please Note: Shorter is better. You will have a better experience if you can split your longer documents (even if they are 106" or less) into multiple shorter print jobs. There is no cost penalty for doing so.
Process Overview
- Prepare & optimize your file.
- Secure funding. Review the pricing tab in the navigation pane and verify that you have the appropriate amount of GopherGold on your account.
- Upload your file to the shared Google Drive.
- Ask an attendant to print your file.
Before you print, note the following:
- Margins— Our plotter printers have a maximum printable width of ~41.5". If your smallest dimension(s) exceeds this, your file might be shifted, clipped, scaled, or adulterated. Additionally, please build appropriate bleed and margins into your file, and do not rely on the printers to create margins for you if they are a part of your design.
- Optimize your file— See Saving As PDF/X & Optimizing Your File for optimization settings/steps.
- File Format— Please output your files in a PDF/X format. See Saving As PDF/X.
- File Names—Use a filename that uniquely identifies your file. Build your student username into your filename. E.g. <your_username>-<your_filename>
- Have your output and original file(s) with you— Upload your original pre-PDF file to Google Drive or bring it in on a USB. This way, we can help you troubleshoot your original file if necessary.
- Have appropriate expectations— Each print job can take an average of ~5-10 minutes, not including its time spent in the queue. It is common to wait hours during peak times like reviews and finals. Planning can help reduce stress.
- Give yourself plenty of time— Large-format printing takes time (optimization, creating a PDF, correcting orientation, etc…). Make time for the possibility of a re-print, especially during peak demand periods, like review/finals weeks. Submit your file(s) at least 24 hours before they are due to minimize stress on yourself and others.
Guide: Epson InkJet Printing
Guide: Epson InkJet Printing
Follow the tips and steps below to make your Epson InkJet printing experience as stress-free as possible:
Size Limits (Transparency/Personal Paper):
Transparency and Personal Paper Max Document Width: 17"
Personal Paper Max Document Length: 22"
Transparency Max Document Length: N/A
Process Overview
- Prepare & optimize your file.
- Secure funding. Review the pricing tab in the navigation pane and verify that you have the appropriate amount of GopherGold on your account.
- Upload your file to the shared Google Drive.
- Ask an attendant to print your file.
Before you print, note the following:
- Document size— Our Epson InkJet printers have a maximum printable width of 17" regardless of the medium you choose to use.
- Optimize your file— See Saving As PDF/X & Optimizing Your File for optimization settings/steps.
- File Format— Please output your files in a PDF/X format. See Saving As PDF/X. We reserve the right to reject any files that do not conform to our formatting standards.
- File Names—Use a filename that uniquely identifies your file. Build your student username into your filename. E.g. <your_username>-<your_filename>
- Have your output and original file(s) with you— Upload your original pre-PDF file to Google Drive or bring it in on a USB. This way, we can help you troubleshoot your original file if necessary.
- Have appropriate expectations— Our epson inkjet printers need to clean themselves after periods of inactivity. If you are the first print of the day, wait times of ~10 min are not uncommon before your job can print.
- Give yourself plenty of time— Printing takes time (optimization, creating a PDF, correcting orientation, etc…). Make time for the possibility of a re-print, especially during peak demand periods, like review/finals weeks. Submit your file(s) at least 24 hours before they are due to minimize stress on yourself and others.
Saving & Optimizing Your File
Save As a PDF/X
Save As a PDF/X
Open your document using the Adobe Product you used to create it and save a COPY of the original file. (If you used a non-Adobe product, first save/export your document as a PDF and then open that PDF in Adobe Illustrator). All lab computers have licenses for the Adobe Products below.
| App Name | App Icon | Action Path | Save As Type |
|---|---|---|---|
| Adobe Illustrator | 
| File > Save As* | Adobe PDF |
| Adobe Photoshop | 
| File > Save As* | Photoshop PDF |
| Adobe InDesign | 
| File > Export* | Adobe PDF (Print) |
* Save/export to your computer, not Adobe Creative Cloud.
- Verify you are about to perform the following on a COPY of your original file. DO NOT perform the following actions on your original file.
- Flatten your file's layers. Look online for directions specific to the program you are using. See Optimizing Your File for more information.
- Remove any unused elements. See Optimizing Your File for more information.
- Follow the appropriate action path from the diagram above to export/save your file. Also, select the appropriate Save As Type.
- Select PDF/X-3:2003 in the Standard section of the next dialogue box.
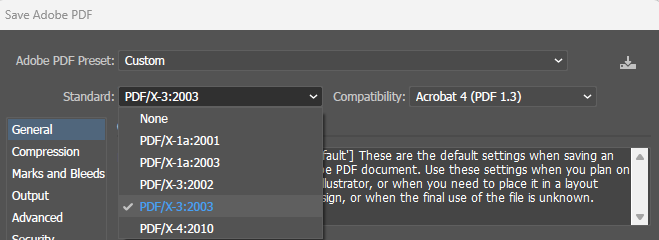
- Then click Export/Save
Optimizing Your File
Only perform the following on a COPY of your original file.
- Save as a PDF/X— PDF/X is an excellent choice for printed media because it is designed to fulfill specific printing-related requirements, whereas other PDF standards are not. Always use this format unless otherwise instructed by your professor.
See the related section above for instructions. - Consolidate Your Print Jobs— For example, if you only need a few pages of a file printed, please compile them into a PDF with only the pages you want printed. It is not the responsibility of our staff to print specific pages of PDF files when requested. Staff may choose to do this during low-volume times but may refuse during busy periods. Please provide a PDF with ONLY the data you want to be printed.
- Flatten File Layers— Flattening layers removes information under stacked layers so that the print only processes the visible information. Please look online for information on how to flatten a file in your specific application.
- Remove Unused Elements— Latent SVG data present in the file but not in the printable area can cause strange behavior in our printers. Please remove any data from your file that you do not expect to be printed. A good rule of thumb is to delete any element(s) or parts of elements that are not on your artboard (or equivalent) before saving in an output file format such as PDF/X.
- Fully Rasterize Your PDF— This is now a part of our automated process. There is no need for students to do this to their files. We'll take care of it for you! If you would like to know more about the process and get a look at what our system is doing, please review the steps in these instructions. Rasterization ensures that your print job will be communicated to our printers in a language they understand much better than vector graphics.
Troubleshooting Low-Quality Elements In Your Print Job
Check your exported PDF for low-resolution assets—Always double-check your exported file to ensure you get the expected resolution. Some Adobe Apps, like Adobe InDesign, purposefully downsample how your elements are displayed on a computer screen, but not how they will be printed. The best way to verify your printed resolution is to inspect the exported PDF visually before submitting it.
Use high-quality raster assets— Use high-resolution assets and understand how image size affects resolution. Typically, raster assets will become more pixelated as you increase their size. Always try to target 300 DPI to maintain resolution quality.
Check your asset links— Ensure there are no broken links in your file. If the link to the original asset breaks, Adobe apps will place a low-resolution copy of your asset in your file. A good way to ensure your assets always populate at their native resolution is to embed them. Instructions for this can be found online.
Export at the correct resolution— When exporting your file as a PDF, pay close attention to the compression and DPI settings. Always target 300 DPI for your output resolution.
You should not compress images to any value above or below 300 DPI. Lower numbers will result in pixelated elements. Higher numbers will only make your print job take longer.
Most Adobe programs will default to 300 DPI if you choose the correct export option, but you must double-check before submitting your file to us. This is especially important when using programs like Adobe InDesign, where exporting as an Adobe PDF (interactive) defaults to 72 DPI.
Upload To Google Drive
Whenever you need a lab attendant to print something for you, please add it to our shared Google Drive. To do so, navigate to our shared Google Drive z.umn.edu/cdesprintdrive and place your files in your folder. If you do not have a folder, please create one with your name/username. Do not use this drive as your primary storage. Files are deleted at the end of each semester!
Please Note: Since you are the owner of your folder, it may still appear in your personal Google Drive even after we delete it from ours; However, it will not be connected to the shared Google Drive. Please create a new folder in, our shared Google Drive z.umn.edu/cdesprintdrive at the beginning of every semester.
Laptop Drivers
All Users: Students may install the drivers below on their laptops for printing to the College of Design laser printers in the Rapson and McNeal labs. We keep these drives as up-to-date as possible, but we cannot guarantee that they will work with your specific device. PLEASE NOTE: If these links do not take you to a new page, it likely means that they automatically started the driver download. Please check your downloads folder for the driver.
Windows Users: You will need to run the installer as an administrator. You can look online for how to do this.
Apple Users: The drivers here are the same as those on our lab devices. You should use a Windows lab computer to print double-sided or on tabloid (11 x 17") paper. Please read the laser printing guide to learn about limitations like these when printing from an Apple device.
| Windows Drivers (OS versions 8.1 and 10) | Mac OSX Drivers (10.13 and higher) |
|---|---|
Frequently Asked Questions
Are there other printing options outside of the College of Design?
Yes. There are public computer labs on campus, and University Printing Services. Commercial print shops are also a possibility. However, these options typically result in a much higher cost than printing available through the College of Design.
What happens if my print job is not printed correctly?
You will need to see a lab attendant as soon as you notice a printing error. If the error is a result of a printer problem or other problem not resulting from user action, the lab attendant will re-print your document free of charge. Common printer problems include paper jams, ink splatters, or stripes.
Do your best to double-check your work before printing, especially if it is an expensive printout. We cannot give refunds for reprints unless due to a printer problem or something out of your control.
How can I minimize printing costs?
There are many things that lab users can do to reduce their printing costs without impacting their design activities.
Print Preview
This is a great feature offered by most programs at the computer labs. Print preview allows you to see how your pages will look prior to printing. Mistakes can often be seen and corrected before a single piece of paper is used.
Print Double-Sided
Double-sided (duplex) printing reduces waste and all of our laser printers have this feature available. Please see a lab attendant for assistance with double-sided printing.
Print Multiple Pages to a Single Sheet
Virtually all applications allow you to print more than one page to a single sheet. Doing so allows a document that might normally require 20 sheets to be printed on five sheets with four pages per sheet. This is an excellent option if you happen to be printing out notes for class.
Print Only What You Need
If you don't need an entire document, identify which pages you need using the "print preview" feature and then selectively print only those pages.
How will I pay for my prints?
Students pay for prints using their GopherGOLD account (which is accessed via your UCard). This allows students to easily manage funds online and have real time access to their account. For more information about the GopherGOLD program, visit the UCard Office website.
Where do I go with questions about UCard charges?
All inquiries about charges made on your GopherGOLD account must be taken up with the UCard Office.
Paper Specifications
NOTE: The printable width of our (and most) printers is slightly smaller than the paper they use. The paper dimensions below represent the width of the paper itself and not the usable printable width.
This is especially important when working with our large format printers. Please familiarize yourself with the margins section of the Large Format Printing Guide located in the printing instructions section of this page.
Laser Paper, Bond
Sheet Sizes: 8.5 x 11" OR 11 x 17"
Thickness: 24lb (90gsm)
Vendor Notes: Premium laser printer paper is capable of producing sharp, clear images on both color and monochrome laser-based equipment. A must have for everyone, from home-office to design professionals, it's ideal for color copies, proposals, reports, layouts and letters. Backed by the 99.99% Jam-Free® Guarantee. Acid-free material prevents yellowing over time to ensure a long-lasting appearance.
Large-Format, Bond
Roll Width: 42"
Thickness: 20lb
Notes: This paper is slightly thinner and less high-quality than our laser paper. It is suitable for test prints and experimentation.
Large-Format, Matte
Roll Width: 42"
Thickness: 180gsm
Vendor Notes: Bright white, matt, coated special paper for posters and indoor advertising applications. This paper is optimized for printing with aqueous ink systems. Prints are splashproof, resistant to erasure, and impress with high color density and vibrant colors. This material achieves very good contour sharpness and is therefore predestined for printing CAD drawings. Its 180 g/m² weight provides very good flatness and high stiffness.
Large-Format, Satin
Roll Width: 42"
Thickness: 170gsm
Vendor Notes: Satin, PE-coated photo paper for poster and photo applications. This micro-porous coated, satin finish photo paper with a PE film on both sides is ideal for an indoor poster or photo applications. This product has been specially developed for printing with aqueous inks, enabling quick drying. The coating leads to an antireflective pearl finish, soft color transitions, and high resolution of details.
Large-Format, Cotton Sheeting
Roll Width: 42"
Epson InkJet, Transparency
Roll Width: 17"
Thickness: 5 mil
Vendor Notes:
- Dimensionally stable film means great registration and no curling
- Quick dry time equals faster process times and less ink usage
- Accurate dot placement results in excellent line definition and acuity
- High ink load capacity
- Minimal "yellowing'' allows the processed film to retain the image over time and be used repeatedly
Epson InkJet, Photo Paper
Sheet Size: 8.5 X 11"
Thickness: 12 Mil.
Vendor Notes: This heavyweight 12 mil paper is especially suited for wide-format prints. It is similar to Premium Luster Paper but has a 20% thicker base for increased durability and better handling properties. Prints are less likely to kink, eliminating the “half moon” mark common when handling wide format prints.
This is an “E” surface paper that is traditionally used in the portrait and wedding markets. It features a rich texture that breaks up reflective glare, and reduces gloss differential commonly found with pigmented ink sets available in the market.
Epson Personal Paper
Max Sheet Width: 17"
Max Sheet Length: 22"
Max Sheet Thickness: 0.8mm
Notes: Our printers are known to have issues with foiled and other decorative/ specialty papers. We will try our best, but we cannot guarantee that your particular paper will work. Our lab attendants reserve the right to refuse paper we have confirmed, or suspect may not work on our devices.
")
")
")
")